Showing posts sorted by relevance for query dish room. Sort by date Show all posts

February 23, 2025

the evolution of the dish room


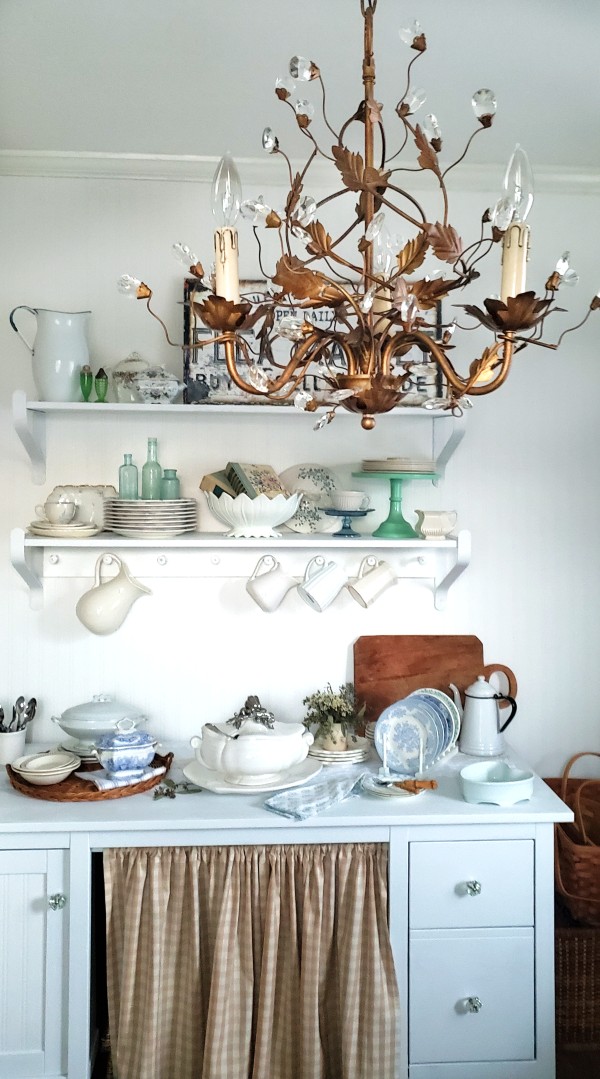
Here’s another look at the new area in the house that I'm calling the “dish room”. 


Throughout the seasons, it’s really proven to be quite useful and popular for photo shoots, as well as housing all my extra plates, home accessories and vintage colored glassware.


Last year I decided to take an unused bedroom and use it as the main hub for a lot of my styling props. 


Here it is styled for the autumn months. Brown and white transferware, copper accessories and lots of natural textures five this space a fall vibe.


A cottage farmhouse display was set up against the big wall with furniture that was already in the room. I just added a peg rack to the shelves that were already in the room. 


I did have to paint the shelves white and move them to the center of the wall, but all in all, this was all very budget friendly.


A dark brown-black Ikea desk and the two shelves were transformed with a few coats of white chalk paint. I papered the wall with a fun beadboard textured wallpaper which saved me quite a bit of money on using actual beadboard.


All I bought, besides the wallpaper, was a custom-made peg rack to fit right under the bottom shelf and a cute gingham curtain for the desk opening.


I also found the most adorable vintage chandelier to finish off the room. This is now a great spot for my early morning photo shoots and also fulfills my organizational tendencies! 😜


My good friend and contractor George found this vintage corner cabinet around the corner from my home, on the curb!! It was free, and he knows my taste so well, that he immediately called me to give me the heads up on this free cabinet.


When we found this piece, it was painted with a very shiny and bright enamel paint that was just starting to peel off.


A lot of elbow grease, sanding, scraping and now this piece was ready for a new coat of paint.


I painted it a neutral grey-green color. In this photo, it looks greener than it does in real life. It’s a great farmhouse style neutral color.


With all the pretty dishes and plates I’ve collected over the years, I decided floor to ceiling dishes on the wall was a fun surprise for this main accent wall.


The stage is now set. There’s still time to fill in all the plates, but projects got in the way of it all. I love the evolution of it, so time is on my side.


Some of my favorite farmhouse and cottage style pieces are now on full display here in my new dish room.


And best of all, when Christmas projects came along, this was now the perfect backdrop for some very special stylings…


You may recognize this shot from the winter 2024 issue of Country Sampler Farmhouse Style magazine. Yes, my new little dish room now has proudly graced the cover of a magazine!   


Don’t ask me how this happened! It was a complete and utter surprise, but wow!!! A very special one!  


Here' how the cover shot turned out... 


This dish room is like a dream come true! I love how you've made use of an unused space and turned it into something so functional and aesthetically pleasing.


It's always inspiring to know a little creativity and some resourceful design can completely transform a space.


ciao fabiana


For lots of fun extras, follow me on Instagram!


Please note that this post may contain affiliate links.


February 12, 2025

pink roses in the dish room


💐"If I had a flower for every time I thought of you, I could walk through my garden forever." — Alfred Tennyson


The beautiful winter light that’s reflected by the sky brings out the very best of white decor and is just right to brighten up those slightly gloomy February days. And these roses make me soooo happy!


Here’s a little peek at the new area in the house that I'm calling the “dish room”. In December I decided to take an unused bedroom and use it as the main hub for a lot of my styling props, extra dishware and my collection of colored glassware.


Not only was the space ideal, but the morning light was also so perfect for those early morning photo shoots. 


With that in mind, I set up a cottage farmhouse display wall with furniture that was already in the room.


A dark brown-black Ikea desk and two shelves were transformed with a few coats of white chalk paint. I papered the wall with a fun beadboard textured wallpaper which saved me quite a bit of money on using actual beadboard.


All I bought, besides the wallpaper, was a custom-made peg rack to fit right under the bottom shelf and a cute gingham curtain for the desk opening.


What I thrifted and how I styled it…


Lastly I found the most adorable vintage chandelier to finish off the room! The space is almost complete. This is now a great spot for my early morning photo shoots and also fulfills my organizational tendencies! 😜


The cute little thrifted chandelier transforms my new "dish room" into a cozy little space. My good friend Laura and I were checking out a few of our favorite thrift and consignment stores last week, when we spotted this adorable little chandelier.


It was marked $75, but when I asked the salesperson if that was the final price, she said it was actually 60% off! So, this little darling came home with me for only $30! Yay!!


This is a vintage inspired look I put together for fall. I used lots of white ironstone and hints of brown transferware and natural elements like wicker to create a soft autumn vibe.


I will be sharing lots more on the dish room soon, including a very unexpected surprise!!


ciao fabiana


For lots of fun extras, follow me on Instagram!


You can check out some of my favorites here at “Tablescaping Essentials” 


Please note that this post may contain affiliate links.


March 27, 2018

a few egg-cellent ideas


Just a little Good Friday Easter egg inspiration…


Graphic patterns on pastel eggs
are easy to pull off using stamps made out of
bubble wrap and corrugated cardboard..


I love this blue and white decoupage idea
that’s easy to replicate using pretty paper and Mod Podge.


Wooden eggs painted in a two-tone ombre look is fun!


Everyone loves Jelly Bellys!

what’s your favorite flavor?

I especially love Pina Colada and Root Beer.


brilliant!


And now for a few adorable recipes…


Info on this wood bark cake stand can be found at the end of this post.


ORANGE CHAMOMILE CAKE

For the Cake:
2 1/2 c. whole milk
8 chamomile tea bags
Cooking spray
4 1/2 c. all-purpose flour, spooned and leveled
4 tsp. baking powder
3/4 tsp. kosher salt
1 1/2 c. (3 sticks) unsalted butter, at room temperature
2 1/4 c. granulated sugar
5 large eggs, at room temperature
1 tbsp. finely grated orange zest
2 tsp. pure vanilla extract

For the Frosting:
2 c. (4 sticks) unsalted butter, at room temperature
2 lb. confectioners’ sugar
3 tbsp. fresh orange juice
1 tbsp. pure vanilla extract
1/4 tsp. kosher salt
Plus: Bunny Sugar Cookies and chamomile flowers, for decorating

TOTAL TIME: 1:50
1. Make the cake: Place milk and tea bags in a small pot. Cook over medium heat until warm to the touch (do not let it boil), 7 to 8 minutes. Turn off heat and cool completely; discard tea bags.

2.  Heat oven to 325°F. Grease 4 (8-inch) round cake pans and line the bottoms with parchment paper; grease parchment. Whisk together flour, baking powder, and salt in a bowl.

3. Beat butter and granulated sugar on medium speed with an electric mixer until light and fluffy, 2 to 4 minutes. Add eggs, one at a time, beating just until blended after each addition. Beat in orange zest and vanilla. Reduce mixer speed to low and beat in flour mixture and milk alternately, beginning and ending with flour mixture, just until incorporated. Divide batter among the prepared pans.

4. Bake until a wooden pick inserted into the center comes out clean, 25 to 30 minutes. Cool in pans, on wire racks, 10 minutes, then invert onto racks to cool completely.

5. Make the frosting: Beat butter on medium speed with an electric mixer until creamy, 1 to 2 minutes. Reduce mixer to low and gradually beat in confectioners’ sugar. Beat in orange juice, vanilla, and salt. Increase mixer speed to high and beat until fluffy, 1 to 2 minutes.

6.  Assemble the cake: Place one cake layer on a cake stand or plate and top with 1/2 cup frosting; repeat two more times. Top with the remaining cake layer. Frost top and sides of cake with remaining frosting (save 1/4 cup frosting for bunny tails). Add bunny sugar cookies.

YIELDS: 16 SERVINGS
Recipe Courtesy of Country Living


Lemon Pudding Cake

4 tbsp. unsalted butter, at room temp,
      plus more for the dish
1 c. granulated sugar
3 large eggs, separated
1/3 c. all-purpose flour
3/4 c. whole milk
1/3 c. fresh lemon juice
Confectioners’ sugar, for dusting
Directions

1. Heat oven to 350°F and grease shallow 2-quart oval baking dish.

2. Using an electric mixer, beat butter, granulated sugar and egg yolks in large bowl until light and fluffy, about 3 minutes. Add flour and mix to combine. Reduce mixer speed to low and mix in milk and lemon juice (batter may look curdled).

3. In second bowl, with clean beaters, beat egg whites until stiff peaks form, 3 minutes. Stir one-third of whites into lemon mixture, then fold in remaining whites until combined.

4. Transfer mixture to prepared baking dish and place dish in roasting pan. Add enough boiling water to roasting pan to come one-third of the way up baking dish. Transfer roasting pan to oven and bake until light golden brown, 35 to 40 minutes.

5. If desired, place a bunny cutout on top of cake, then dust with confectioners’ sugar. Carefully lift away template and serve.
Yields 6 servings


Edible Crudité Garden Patch

Spread about 4 cups of hummus in a 9 x 13 baking dish, and then spread 1 ½ cups of ground pumpernickel crackers or pumpernickel bread to cover completely. Place your adorable garden veggies in even rows, as you would in a vegetable garden, and trim as needed. Recipe courtesy of the Food Network.


ciao! fabiana


photo credit:
1,2,4,5  Martha Stewart
3,6,7,  Country Living
8  Good Housekeeping
9 Food Network


November 4, 2024

farmhouse style magazine winter 2024


4 of my projects featured this season


December is off to an inspiring start with the brand-new Winter issue of Country Sampler Farmhouse Style in stores stores now. And I have a little preview for you!


Here's a behind the scenes look of how new cover of Farmhouse Style came together with just a few simple ideas. I was truly caught by surprise when my picture was selected to be on the cover of this Winter 2024 issue!


Just a few festive touches and vintage finds help to create this simple but unique look that is featured on the cover. You can try this at home! It's as easy as it looks!! See the video here.


Lisa Sloan is the new editor of Farmhouse Style now taking over from Susan Wagner, and I love reading the Lisa’s notes from each and every issue. 


It’s the most helpful companion to this magazine and helps me to make sure I don’t miss a thing in this jam-packed holiday issue.


Cover photo


Here's the photo I submitted for an article called “Homes for the Holidays.” It’s a playful and pretty look at small-scale houses that can create imaginative and festive scenes in miniature. You can check out all the projects starting on page 6.


You can see some of the examples of tiny Christmas houses here.


Check out this video HERE as I explain and recreate the cover shot in my new “dish room”.


For this winter 2024 issue, I have 6 projects and 2 recipes featured and I can’t wait to show them to you! As a contributor to this magazine for the last 6 years or so, my projects and recipes are usually featured in the “Do-It-Yourself Farmhouse” section.


Isn’t this a fun project?! It’s so easy to make these Santa Sacks with a pretty but slightly damaged vintage tablecloth. Tablecloths are such a great source of fabric for so many projects!


A collection of festive vintage cans and tins are the perfect vessels for planting herbs during the holidays. 


They certainly do brighten up a sunny window and come in handy for using in all sorts of holiday recipes.  


Here are the two vintage inspired ornaments I made for Farmhouse Style magazine. The first are a set of real walnut shells filled with a bit of moss and festive little red toadstool, or mushroom. 

I finished them off with a little bakers twine in a fun red and white twisted pattern for easy an display from a Christmas tree branch. 


Secondly, I sewed little burlap hearts with a velvet needlepoint thread and then embellished them with a tiny jingle bell.


I think they add the old-fashioned farmhouse charm to any tree. Don't you just love handmade Christmas ornaments? They add something so special to the tree.


An advent calendar made from a set of mismatched (but very coordinated) handmade felt stockings is another one of my projects that’s featured in this winter issue. 


I chose a select color palette of felt pieces and stuck to those colors for every little stocking. I also used vintage rickrack, in dark red and white on a few of these guys!


Wouldn’t they also look cute as ornaments on the tree?


Two showstopping desserts I made are also featured in this issue starting on page 108. I had never made a Kransekake or a Pavlova before, but I’m always up for any challenge, and they proved to be worth every drop of sugar and egg whites to make these 2 beauties!


A Krasekake is a traditional Norwegian dessert translating to “wreath cake” and features 18 stacking rings of different sizes. It truly is breathtaking and soooo very delicious!


This Pavlova is a light meringue and fruit dessert that’s out of this world, and is even topped off with a yogurt and cream mixture for an even greater contrast in flavors and textures.


A variety of fresh berries and mint sprigs give this luscious dessert all its character and good looks… it’s a Christmas showstopper, for sure!!  


In case you haven’t heard, I started a new Instagram page in October and named it Claudia Fabiana Home. My former page is still up, but after getting a new phone, I was no longer able to log into this account, so the new profile was born!


I hope you’ll follow along with me on Instagram for all the latest projects and décor I will be sharing in 2025.


ciao fabiana


For lots of fun extras, follow me on Instagram!


You can check out some of my favorites here at “Tablescaping Essentials” 


Please note that this post may contain affiliate links.


sub


Related Posts Plugin for WordPress, Blogger...

more recent posts...


Related Posts Plugin for WordPress, Blogger...


Related Posts Plugin for WordPress, Blogger...