Showing posts sorted by date for query painted furniture. Sort by relevance Show all posts

February 23, 2025

the evolution of the dish room


Here’s another look at the new area in the house that I'm calling the “dish room”. 


Throughout the seasons, it’s really proven to be quite useful and popular for photo shoots, as well as housing all my extra plates, home accessories and vintage colored glassware.


Last year I decided to take an unused bedroom and use it as the main hub for a lot of my styling props. 


Here it is styled for the autumn months. Brown and white transferware, copper accessories and lots of natural textures five this space a fall vibe.


A cottage farmhouse display was set up against the big wall with furniture that was already in the room. I just added a peg rack to the shelves that were already in the room. 


I did have to paint the shelves white and move them to the center of the wall, but all in all, this was all very budget friendly.


A dark brown-black Ikea desk and the two shelves were transformed with a few coats of white chalk paint. I papered the wall with a fun beadboard textured wallpaper which saved me quite a bit of money on using actual beadboard.


All I bought, besides the wallpaper, was a custom-made peg rack to fit right under the bottom shelf and a cute gingham curtain for the desk opening.


I also found the most adorable vintage chandelier to finish off the room. This is now a great spot for my early morning photo shoots and also fulfills my organizational tendencies! 😜


My good friend and contractor George found this vintage corner cabinet around the corner from my home, on the curb!! It was free, and he knows my taste so well, that he immediately called me to give me the heads up on this free cabinet.


When we found this piece, it was painted with a very shiny and bright enamel paint that was just starting to peel off.


A lot of elbow grease, sanding, scraping and now this piece was ready for a new coat of paint.


I painted it a neutral grey-green color. In this photo, it looks greener than it does in real life. It’s a great farmhouse style neutral color.


With all the pretty dishes and plates I’ve collected over the years, I decided floor to ceiling dishes on the wall was a fun surprise for this main accent wall.


The stage is now set. There’s still time to fill in all the plates, but projects got in the way of it all. I love the evolution of it, so time is on my side.


Some of my favorite farmhouse and cottage style pieces are now on full display here in my new dish room.


And best of all, when Christmas projects came along, this was now the perfect backdrop for some very special stylings…


You may recognize this shot from the winter 2024 issue of Country Sampler Farmhouse Style magazine. Yes, my new little dish room now has proudly graced the cover of a magazine!   


Don’t ask me how this happened! It was a complete and utter surprise, but wow!!! A very special one!  


Here' how the cover shot turned out... 


This dish room is like a dream come true! I love how you've made use of an unused space and turned it into something so functional and aesthetically pleasing.


It's always inspiring to know a little creativity and some resourceful design can completely transform a space.


ciao fabiana


For lots of fun extras, follow me on Instagram!


Please note that this post may contain affiliate links.


September 16, 2018

always a project or two around here!


Happy Sunday!

It’s been so nice here in Newport, and the mornings and most of the day have been actually quite cool and it’s really starting to feel like fall.

I’m just waiting for that “Indian Summer” weather to kick in one of these days, but in the meantime, it’s been extremely pleasant here, and perfect for working on some things around the house.

I kind of just wanted to show you what I've been up to this week...


Please excuse these pictures I took with my phone. They’re a little flat and just were intended to show my mom the progress on the dresser in my dining room that I painted with milk paint last week.

But things are finally coming together in this funny little dining room of ours. It actually only has one wall, and this is it. The rest of the perimeter of this room opens up to the living room, kitchen nook and hallway.  

So while my husband was out of town last week, I spent three whole days sanding, painting and waxing this piece [e]. It was originally part of a “suite” of furniture from my husband’s nana and it works perfectly in this room.  

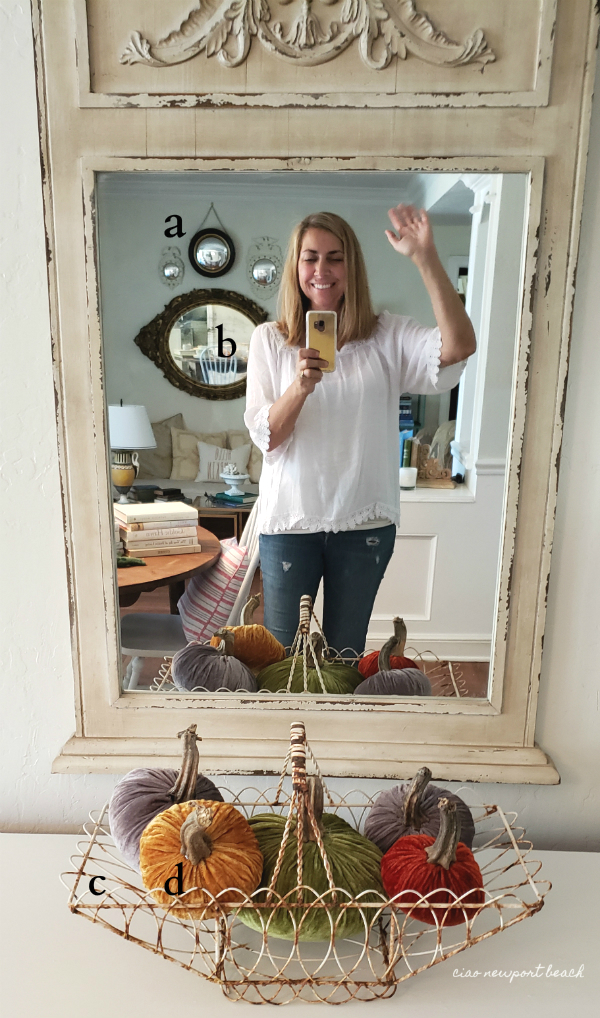
I found the mirror [a] a few months ago at my favorite local thrift store. At first, I thought I scored a cool antique, but when I was loading it in my car, I noticed it was marked Pier One! I balanced each side of the mirror with a pair of vintage majolica lamps [d], also from nana. All they needed where some new oval lampshades.

A few of my favorite black and white plates [b] balance out the look on each side. These are just a collection of some of my favorites that I pick up here and there. And a grouping of white books [c] acts as a centerpiece, for now.


Here’s me just snapping a little pic to show my mom this cute wire basket [c] I had just scored at an estate sale a few minutes before! Only six bucks, and I just quickly filled it with a few velvet pumpkins [d]. I actually found these at Home Goods, and guess what? I pulled off the plastic stems and hot glued some real ones on!

Ssshhh… don’t tell anyone! Did you know they actually sell real pumpkin stems on ebay? Yah, well now we all know!  

Reflected in the mirror, you can see another one of my favorite collectibles, round convex mirrors [a]. If they’re brown when I find them, I usually paint them white with gold accents, but if they’re already black or crème colored, I usually let them be.

The oval mirror [b] is a family heirloom, probably French. 


This little vase of blush colored roses is a sneak peek at one of the exclusive tablescapes I put together this week. I’ll fill you in on it soon!

I’m currently working on an amazing Halloween tablescape in my dining room that’s filled with lots of spooky vintage accents. 


When I saw this blue and white entry on Instagram, I “instantly” fell in love with it and thought this look would be perfect for my front entry, since I already have similar wainscoting.

I’m on my way to Farrow and Ball this morning to look at their wallpapers…


I recently found out through Ancestry that I’m not only 68% Italian, but I’m also 19% French! Ooh la la ! News to me! (They recently updated their DNA data.)

So when I spotted this cute French inspired side door in the neighborhood, it just spoke my language, and I couldn’t resist taking a quick pic. Those French doors, shutters and the little iron gate are just darling!   


↑
I also wanted to share my most popular post on Instagram this week, and I was thrilled when Roger’s Gardens reposted it!

If you don’t already follow me [here],

I’d love it if you did. 💝

I share lots of extra stuff there that
you won’t see on the blog!

Thanks!!


 ciao! fabiana

P.S. Don't forget to follow me on instagram for all the latest!


November 16, 2015

creating a cozy dining room

 from the new book the inspired room


A Dining Room That Invites You to Stay
As welcoming as you want your home to be, dining rooms in particular can end up feeling standoffishly stiff —the kind of room you only use when the boss comes over for dinner. Try thinking about this space as you would any other room in your home. Pay attention to the small details that will make the difference between a room you simply pass through and a room that invites you in daily to connect and converse over a meal.
My dreams for our dining room were simple. I wanted a room that was comfortably quirky enough to put our guests and family at ease, yet stylish enough to dress up for those special occasions when one feels inclined to whip out the crystal glasses.
Here are three essentials for an inviting dining room:


A Striking Statement
If you feel that your dining room lacks personality, why not start with a statement piece? A dramatic light fixture or a substantial piece of art or furniture draws attention and sets the tone for your space.
A hint of old-world charm became our unique statement. We removed a rather unoriginal chandelier and then installed an oversized outdoor copper-and-iron lantern. Instantly, this became our focal point and a design launching point.


A Refreshed Backdrop
Oftentimes the ideal starting point is to address the backdrop elements, such as walls and floors.
After years of living with wall-to-wall carpet (not ideal in a dining room), we celebrated the day we installed beautiful hickory hardwoods. The rustic two-toned wood transformed our space and provided a visual connection between the rooms.
At the time, this space was a sophisticated dark gray with white trim. I loved the look until the day the dining room walls begged me to be white. Don’t worry. My walls don’t really talk to me. And if they did, they would insist on being covered with white wood planks. But to suit our budget, we painted the drywall white instead. If I squint, I can pretend it’s wood. The cheery white backdrop and complementary flooring create a clean canvas for our ever-changing decor.


Keeping it Real
Years ago we painted our table white without the leaves in place. When it came time to expand the table, we realized the leaves were still au naturel. We kept them that way and have ever since! Our happy accident has become a unique statement piece.


These lovely excerpts are from The Inspired Room, 
a brand new book by Melissa Michaels of The Inspired Room blog, one of my favorite daily reads! 


ciao! fabiana

May 28, 2015

a visit to Peinture Studios


This sweet little vintage table was a hand-me-down from my in-laws. I had spray painted it a few years ago, but now I felt it needed some love. With the help of owner, designer Deborah Waltz of Peinture Studios, I was able to transform this little table into a lovely heirloom piece that feels right at home in my living room. 

Deborah suggested a combination of chalk paint, 2 kinds of soft wax, gorgeous gilding wax and new Annie Sloan stencils, and gave me great pointers to on how to complete my project.    
     

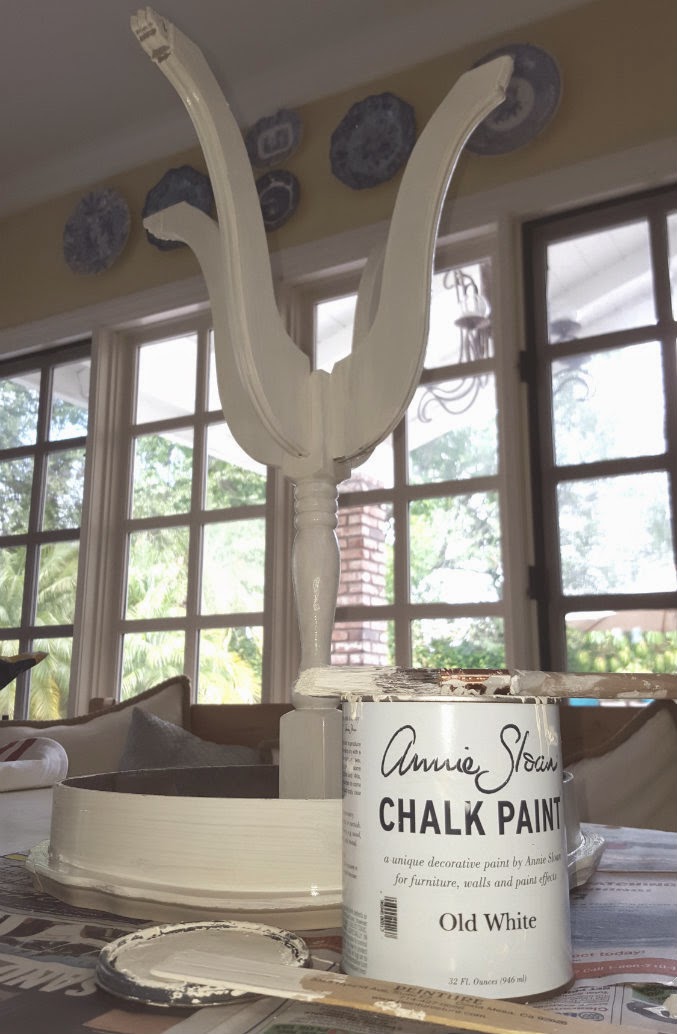
I love a little paint project, but I especially love the instant gratification you get by updating a piece of furniture with paint.  No paint is easier to use than Annie Sloan Chalk Paint.  It requires no sanding so you can skip all that prep work and just get right into painting.  


We chose to start with Old White as the base.  Deborah has a fabulous display wall in her studio that features every color of Annie Sloan Chalk Paint, each on a unique vintage chair.  The chairs are hung up on the wall by rope in a really creative display.  It’s a great visual to actually see what the color looks like on a piece of furniture.
       

We stepped into the workshop of Peinture Studios to assess my table and what fun techniques I could use on it to enhance pretty shape of the table.  Deborah teaches beginner and advanced classes here in her workshop several times a month.    


To start, Deborah suggested I place the piece upside down. That way all the surfaces would be covered, and I could finish off painting it right-side up to get a nice clean look on the top of my table, which is the most visible. 

Here‘s the table back at home, with its first coat of Old White. (It took two coats to evenly paint the piece. The paint dries quickly, so I was able to work fast.)   


Next, I applied the Annie Sloan clear soft wax on the entire table.  I then went in and accentuated all the grooves of the table with the dark wax. All I needed was just a little in the cracks and then it was rubbed off immediately with a soft cloth. 

A little of the colored wax goes a long way.  If too much is applied, it can be removed with clear wax. This tip from Deborah was really important, because it’s really fun to play with the different depths of color, and too much can be easily removed with this method. Using painters tape, I positioned the first stencil in place, the nymph. 

With a really soft touch of my finger and a small stencil brush, I applied the beautiful brass colored gilding wax within the stencil, being careful not to glop too much on near the edges. I did the same with the branches stencil.  (I immediately washed my hands after applying the wax.)


The branches stencil was pretty intricate, so I found that using a Q-tip dipped in clear wax easily removed any excess gilding wax that was not within the design of the stencil.  


The Annie Sloan stencils are an exciting and new addition to the Annie Sloan product line. Peinture Studios has an exclusive collection of them at the moment.


I love how the curvatures of my table are accented with these paint techniques.  I even applied the gilding wax to the little metal claw feet of the table for an extra, but subtle little added shine.


This is how the table turned out, and I couldn’t be happier!  It’s found a great spot next to a comfy cane-backed chair in my living room, and it's now the perfect place to enjoy a little tea or coffee. 


Visit Peinture Studios at SoCo in Costa Mesa for more inspiration, supplies and great creative workshops.  The workshops are so fun!  You get to bring in a piece of furniture and you leave with a custom painted creation made by you!  


I'd love to hear about your projects. 


ciao! fabiana


April 1, 2014

painted furniture


This fun pic from BHG has inspired me to work 
on a couple of painted furniture projects this weekend. 

The first is my hall tree that's similar 
to this one shown above. 

I have had one in my entry forever 
that was painted dark green. 
It belonged to my husband's Nana, 
and we really treasure it and 
use it everyday to hang our hats, 
jackets and dog leashes.  


Our first project for the weekend, 
transforming the hall tree into 
something really fun! 

So, I headed to Peinture Studios to get some 
Annie Sloan Chalk Paint. 
I've decided on a mixture of 
Florence and Provence.


It was the perfect color combo, 
and the small sample sizes were just right. 

Here's some of the inspiration 
from pinterest that got me going... 


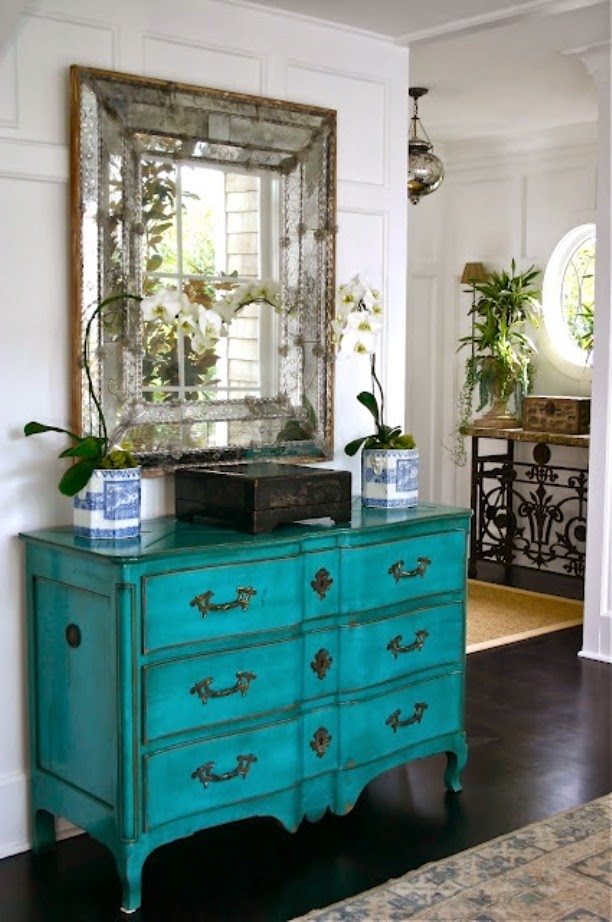
This perfectly gorgeous turqouise, teal dresser 
featured on Mary Ann's blog 
Classic Casual Home. 


An assortment of fun chairs from Cup of Te.


A sweet little gray desk with 
pop of coral from Miss Mustard Seed.


Minty fresh green chairs from the Glitter Guide.


The perfect green accent via Coco Cozy.


Everything Turquoise featured this traditional style bed.


Tobi Fairley does black and white.   


This faux bamboo mirror 
is updated in my favorite color.


I love how the chartreuse stools 
tie in with the artwork 
in this kitchen by 
Lisa Sherry Interieurs. 


 Ombre done right by Gus and Lula.


This bar set up comes alive on 
top of this painted antique piece. 


Pretty antique white finish by Ethan Allen.


I really love the amazing color samples at Peinture.  
The chairs on the wall are such a fun idea!

ciao! fabiana


p.s. Here’s our other project.
The kitchen table is in the middle of being
 painted in Old White. 

Mr. Ciao is helping me with this one!

sub


Related Posts Plugin for WordPress, Blogger...

more recent posts...


Related Posts Plugin for WordPress, Blogger...


Related Posts Plugin for WordPress, Blogger...